Showing posts with label Natural Family Living. Show all posts

Friday, June 10, 2011

Snacktime Round-Up

I’ve shared many of my favorite “make it yourself” recipes. I wanted to bring this series to a conclusion by offering some encouragement as well as a dose of reality.

Simply put:

You cannot do it all.

I’m not sure about your kids, but mine eat approximately 10,000 times a day. Okay, maybe not that much, but it goes something like this:

Early morning snack with Dad

Breakfast

Snack

Lunch (or “snacky” lunch)

Snack

Dinner

Maybe even one more snack in there somewhere!

It seems like someone is always eating (this doesn’t include the baby’s nursing habits, of course!). As much as I would like to, I’m not there yet with making every single snack from scratch. I know some people do, but I’m not quite that organized!

Here’s what I recommend if you are making a shift from store-bought to at-home:

1. Pick and choose. Decide what’s most important to you. Is it to avoid added sugars? Dyes? White flour?

2. Start by replacing one store-bought item with homemade. You don’t necessarily even have to make the switch for each time the item is consumed. Go through a lot of bread? Maybe resolve to make bread for lunchtime PBJs on Tuesdays and Wednesdays. Maybe it’ll be chocolate graham crackers the third Friday of each month for a weekend treat.

3. Once you feel comfortable with one, add another.

4. Make a schedule. Know that Thursdays are always slow? Make your yogurt and applesauce for the week then.

5. If you stick with store bought, choose a better option. Instead of Ritz crackers, we eat Late July.

I tend to rotate what I make. I always, always bake my own bread/rolls and make my own yogurt. Other than that, it fluctuates. During apple season, I make a lot of applesauce. During the summer, I make ice cream. I go through cycles of making and freezing my own stock and tomato sauce. Occasionally, I make crackers. Once a week or so, I bake cookies or another dessert and make other items like granola bars, brown rice snacks, or Jell-o.

My next goal is to add tortilla making to the rotation!

Find what works! The journey from refined to real food does not happen overnight!


Friday, May 27, 2011

Yogurt: A Powerhouse

In my opinion, yogurt is a “power food.” Loaded with probiotics, calcium, and protein it’s my favorite go-to for a quick pick-us-up.

Yogurt is also one of our favorite foods to “doctor” for snacks and meals. There are so many options! Yogurt is delicious on its own, in smoothies, with fruit, as a dressing, marinade, dips or garnish!

Since we’re talking about snacks this month, let’s focus on that for today.

First, you need to choose your yogurt. I make my own every week or so, but if you’re buying yours, go for the simplest choice out there: plain (full fat is best, and choose low-fat options carefully).

Avoid yogurts geared especially for kids (packed with sugar, artificial flavors and colors) as well as most fruit-flavored choices and “light” yogurts. Remember that while these sound appealing in terms of calories, the real food is replaced with artificial sweeteners such as aspartame, dyes, preservatives, and the fat is sometimes replaced with fillers to help the taste.

Be aware that even organic yogurt products still have thickeners, sugar, and some form of coloring, even if it is more “natural.”

Read your labels! The ingredient list should say “milk” and “active cultures.” Nothing else!

It is far better to have a serving of plain, yogurt you sweeten or otherwise enhance yourself !

I can hear your protests now, however, about the convenience of single serve yogurt and the moans about pickiness from kids. I know! The ideas I have below are very simple, however, and something should appeal to everyone!

  • If you must, you can find plain yogurt in single serve containers. You can start there and add your own fruit or a dollop of honey.
  • Make your own single serve containers! I always keep my eyes open for small 1/2-1 cup containers. There are options out there in plastic or glass.
  • If you aren’t a fan of whole fruit in your yogurt, puree yogurt and fruit (fresh in season or frozen if not) and pour into containers. (Add a tablespoon of honey or maple syrup if you need to). This only takes a few minutes every time you do it and you are ready for snacks or lunches.
  • You can also freeze portions of your fruit/yogurt combo. I freeze in ice cube trays for babies and young toddlers and in freezer pop molds or Dixie cups for older kids. Sure to delight on a hot day!
  • Mix a little fruit juice with yogurt and serve immediately or freeze for another popular treat.
  • Yogurt and granola is, of course, a classic combination. I haven’t found my perfect granola recipe yet, so please share if you have one!
  • If you’re interested in branching out, goat’s milk yogurt is one of my favorite indulgence. It’s delicious on its own, but can also be served with fruit, nuts, or cereal.

There are dozens of ways to dress up plain yogurt. Get creative then come back to share your ideas!


Friday, May 13, 2011

Healthy Snack Choices

For the remainder of the month I’m going to be sharing a few of our go-to snacks. These are all very quick and very simple ideas.

Our goal in our house is avoid as many packaged foods as we can. We strive to eat whole foods and homemade as much as possible. I recently read a startling article about just how many preservatives and food dyes many people consume, even when they are eating “healthy” foods.

Here’s a snippet:

Based on the anecdotal information I see in my client’s food journals, people eating processed and packaged foods are taking in exorbitant amounts of artificial ingredients and additives. Typically, a client will say something like, “I eat a bowl of cereal with low-fat milk, have yogurt for a snack, and a Subway sandwich for lunch.” While this sounds relatively harmless, here’s what it might actually look like based on some popular “health food” items:

  • One serving of Kellogg’s Fiber Plus Antioxidants Berry Yogurt Crunch contains more than 13 different additives, preservatives, and food dyes, including Red 40 and Blue 1, which are known to cause allergic reactions in some people and mutations leading to cancer in lab animals. It also contains BHT, monoglycerides, and cellulose gum. In addition, conventional milk often contains residues of artificial bovine growth hormones, known endocrine disruptors as well as antibiotics used in industrial milk production.
  • Dannon Light & Fit Peach yogurt contains more than 11 different additives including Red 40, aspartame, potassium sorbate, sucralose, and acesulfame potassium.
  • A Subway sandwich of turkey and cheese on nine-grain bread with fat-free honey mustard, peppers, and pickles contains more than 40 different additives, preservatives, and dyes. The pickles and peppers have yellow 5 and polysorbate 80, the bread has ten different additives including dough conditioners, DATEM, and sodium stearoyl lactylate, and the turkey contains ten additives as well.

The person in this example has consumed more than 60 food additives eating breakfast, a small snack, and lunch alone, to say nothing of dinner, dessert, further snacking and drinks. Consumers Union’s Dr. Hansen told me, “I wouldn’t be surprised if it were up to 100 additives or more that people are taking in on a daily basis.”

Scary, no?

It’s important to keep in mind that when real food is substituted for low-fat, low-sugar, or packaged, you are losing nutrients– to say nothing of taste– and those good things have to be replaced with something else. Unfortunately, that sometime else is usually a dye, a preservative, or some other unsavory by-product. (MSG with your 1% milk, anyone?)

Now I can hear all of you busy readers (work! kids! home!) saying, ‘I have NO time to make everything from scratch.” Well, you’re right. Maybe not everything. However, over the next several weeks or month, I’m going to share quick and easy snack ideas and offer alternatives to conventional snacks when the inevitable, “What can I eat now?” comes from our kids (or our own tummies).

Later this morning, I have two granola bar recipes to share that you can make in the time it takes to wash a sink full of dishes.


Sunday, March 29, 2009

The Cost of Cloth Diapering

Anwen asked,

I am interested in old-fashioned diapers for the sake of the environment, but...is it cheaper?


The answer is almost always, "Yes!" Cloth diapering can be as simple or as complex, as inexpensive or as expensive as you like!

Prefolds and simple PUL covers like Bummis or Thirsties are the most inexpensive option. Depending on size, a dozen prefolds costs between $21 for newborn to $36 for toddler (you'd need 2-4 dozen depending on how often you wash and baby's age). Simple PUL covers are $11-$13 each and you'd need 4-6.

That would probably break down something like this using Green Mountain prefold prices and estimating $12/cover:

Newborn
3 dozen prefolds- $63
6 covers- $72

Infant
3 dozen prefolds- $81
4 covers- $48

Older Infant/Toddler
3 dozen prefolds- $96
4 covers- $48

Total $408.

Now let's say you buy some wipes rather than make some ($55.80), wipe solution ($14.95), a diaper pail liner for home ($18) and a small wet bag ($12.95) for your diaper bag.

That makes your total $509.70.

Another popular option are all-in-one, one-size diapers like BumGenius. These are another fairly inexpensive option over the course of a cloth diapering "life span," but are more expensive at the outset as they typically run $20+. A friend of mine has been using BumGenius one-size pockets on her daughter since about 6 weeks. She has 30 and spent approximately $538.50.

Add in the extras above and that makes $640.20.

I've never bought disposable diapers or wipes (well, I think one pack of sposies when M. was first born) so I can't say what the average cost is exactly, but today on Mothering someone said her friend spent $200/month on wipes and diapers. Now I have no idea how many children that mother has in diapers, how old they are or where she shops, but let's assume that's a fair estimate. Considering the average child wears diapers for 2-3 years that's somewhere in the neighborhood of $4800-7200. Yikes!

Of course, you may have to consider the extra money to wash and dry diapers. We have our own well and septic system now, but when our first baby was born we were on town water. We generally washed diapers three times a week and saw an increase of around $10 over a three-month period in our water bill, so that would have been $40/year or $120 over three years if we had a late potty learner. I do not remember if our electric changed at all. In those days I didn't line dry at all so the increase was probably minimal since we already had lots of dryer usage. Definitely not too significant when compared to the cost of disposables.

Now I have heard people who live in arid regions make the argument that increased water usage for cloth is not environmentally friendly but I'm still not sure how that would balance over plastic diapers in landfills. I'll confess that while we cloth diaper for cost reasons and because it's more earth-friendly, my primary motivation is because it's better for my babies!

For our first son, we spent roughly the amount in scenario two above. Two sets of Fuzzi Bunz at approximately $300 each, two dozen wipes, a diaper pail liner, a wet bag, and a diaper sprayer for the toilet (though ours was no where NEAR $45!). We had planned on that being IT, at least for baby number two but as I explained previously several things happened: 1) he didn't fit into the small FBs and 2) the mediums were utterly worn out from 18 months of nonstop use.

So...our second baby started out with three dozen prefolds and four covers as in scenario one. We also bought a pack of Snappis, a new bottle of wipe solution, and one more diaper pail liner. We are reusing our wipes, etc.

Once he grew out of those, however, the crazy diaper trials and the buying, selling, and swapping began! We've spent a LOT getting to where we are, but I've been able to sell most of what we didn't like (for almost full price) or gift it to friends/family...and then buy more to try!

I'd say our current stash (not including the accessories we already had on hand) cost about $650. Keep in my mind I use only natural fibers, some organic, and all our covers are wool. I'm expecting this to last us through potty training. So in new diapers for this baby we've spent around $800. This makes our total investment over three years around $1400. With slight increases in water and electrical usage let's say $1500. Not bad! It could be done for a LOT less, but also a lot more. Did you know there are custom-made fitted diapers out there that can run $50 EACH?? I want my babies' tushies to be comfy, clean, and away from nasty chemicals but that is stretching it a bit (in my opinion, of course)!

For anyone trying to sort through the world of cloth diapering, Diaper Pin is a great place to start. I always check out their product reviews before I buy anything!

Friday, March 27, 2009

How We Cloth Diaper Part Two- Caring for Wool

Caring for wool diaper wraps/covers is not nearly as difficult or scary as I once believed it to be!

Here's a quick rundown of my routine:

Spot wash any messes immediately with a wool wash bar. Don't use water that ice-cold or it will shock the wool. Not too hot either!


Wool only needs to be washed every 1-4 weeks (depending on who you asked) and lanolized even less. Here's my routine that includes lanolizing. If it wasn't needed, the process would be exactly the same, just without the lanolin (duh!).

Assemble your supplies. I use Eucalan wool wash, Lansinoh Lanolin (yes, the same thing nursing mamas use!), and liquid lanolin for in-between quick lanolizing.


Here's our brand-new Stacinator ready to go!


First, run the hot water in your sink to melt the lanolin. If you look closely, you can see about half an inch in there.


Once the lanolin has melted (no clumps!) add your wool wash and turn down the water! Water that is too hot will shrink your wool. It should be lukewarm.


Add the cover, face down in the sink and let it sit for 15-30 minutes.


Once the time is up, drain the water from the sink.


Gently squeeze out the water, but don't wring or twist the cover. Then roll it in a towel to press out as much water as possible.


Lay the cover flat to dry in a warm place, but not in the direct sun. It usually takes about 24 hours. Voila! Enjoy your wool!


In a pinch, I also soften the Lansinoh on my hands and gently work it into dry wool and do the same with the liquid. Read more about wool care here and here.

How We Cloth Diaper

Emma asked for a little "tour" of our cloth diapering "lifestyle." So here we go!

We started cloth diapering our first son when he was born with Fuzzi Bunz. They were very simple and they worked pretty well for us and he wore them until potty training last April.

For our second baby, I used prefolds and Bummis covers for the first few weeks then planned to switch to Fuzzi Bunz. Several things happened, however. 1) They didn't fit him quite right. 2) The polyester fleece didn't agree with his skin. 3) Our size mediums, which were worn day and night by M. for 18 months were DEAD. All of these things, but mostly number two, prompted me to decide when the baby was about a month old to switch things up. We tried lots of diapers! Prefolds (love!), BumGenius bamboo fitteds (like), Swaddlebees organic velour pockets and terry fitteds, Bamboozles, Sugar Peas two-size and snap in, and all sorts of covers: Bummis Super Whisper Wraps, Super Snaps, and Super Brites, Thirsties, Sugar Peas wool and fleece, Stacinator, Imse Vimse! A lot of trial and error and here's where we've landed!

One each of the current assortment, from left to right:


Not pictured are Little Beetle Hemp (trim) and Little Beetle One (trim). They were still on the way!


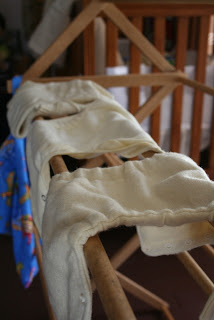
All of our diapers require covers. We use all-natural fibers for both diapers and covers, so we have all wool. The picture below shows wool drying after washing and lanolizing.


Not pictured are the Stacinator and Little Beetle Wrap.


We use Snappis on prefolds and Little Beetles, flannel wipes with Kissaluvs Diaper Lotion Potion and Wedela Diaper Care. We wash with Allens Naturally detergent and do a combo line/machine dry.


Oh, and our older son wears Little Beetle Little Learners and Wool Soaker Shorts at night.

Well, there you go! Stay tuned for part two on caring for wool!