Showing posts with label Recipes. Show all posts

Tuesday, January 24, 2012

Pinning it Down ~ Baptism of Jesus

Our Catholic homeschool group meets once a month for Blue Knights and Little Flowers. My friend and I lead a small group of younger siblings during this time. (I'm planning to share more of what we do with them soon!) While brainstorming for our January session (baptism and the Baptism of Jesus), I saw this fantastic sea shell ornament! It was originally pinned by Lacy of Catholic Icing from Crafolic.

We made a few changes to it...

First, I asked my husband to drill a small hole in the shells for the string/yarn/twine to make the hangar more sturdy.


Second, we used Mod Podge, and mixed the glitter right in!


This is not the easiest project for young kids, but they are a determined bunch and had fun! I ended up gluing the image of the dove and stringing the yarn ahead of time. The kids glued with image of Jesus with a liberal amount of glitter.


I did end up trying another recipe this week as well. We were suffering from the 4 PM doldrums yesterday, so I quickly mixed up some Orange Dreamsicle Smoothies. Yum!


I halved the sugar, but next time I'd skip it all together. Orange juice is sweet enough that you do not need added sugar!

More Pinning it Down here and follow me on Pinterest here!

Tuesday, January 17, 2012

Pinning it Down ~ Food, food, food!

I think the majority of what I pin on Pinterest is FOOD! My pinboard devoted to recipes that catch my eye is spiraling out of control. I think I'll have to divide it into several categories!
This week I chose several recipes to try out!

First up were Sugar Cookie Bars. I thought this was a brilliant idea, and I wish I'd thought of it myself. We love sugar cookies, but I find the hassle too much for everyday use. I do occasionally make roll-out cookies "drop" cookies instead, but this is a much better (and prettier!) idea.

Press your dough into a cookie sheet, bake, cut with a pizza cutter, and voila!


The recipe called for a 13x18 pan, but I used 11x17. A smaller size would work too, the dough just might not fit all at once.

I had some leftover frosting in the fridge, so I frosted a few and added organic sprinkles. They were fantastic! I did end up cutting the bars into smaller squares, though, before serving. They are rich!


A few days later we tried a new breakfast idea: eggs in bell pepper slices!


This was an easy way to add some veggies to breakfast, but I did not perfect the "prettiness" of the dish. I think the trick is thin slices that lie flat in the skillet.

The boys loved them, though, and I'm thinking we'll make them with green pepper for St. Patrick's Day!

Find more Pinning it Down ideas here, and follow me on Pinterest here!

Sunday, October 2, 2011

Apple Sandwiches

Thanks to Pinterest, I found a very yummy looking apple snack, I knew we had to try after apple picking this year.

It was a hit with all the kiddos, and my sister and I loved it as well!


Simply top an apple slice with peanut butter, granola, chocolate chips or raisins, another apple slice and enjoy!


Sunday, August 7, 2011

Breakfast Pizza

When Big Brother asked for pizza for breakfast on Friday morning, I remembered this yummy treat we haven't had in a year or more!


Add what sounds good to you to a biscuit crust, bake and enjoy! Since this was a last minute choice and it was Friday, we just used scrambled eggs and three cheeses (Monterey Jack, cheddar, and provolone). It's also yummy with veggies, bacon, or sausage!

Friday, June 10, 2011

Flames of Pentecost Cupcakes

When the day of Pentecost had come, they were all together in one place. And suddenly a sound came from heaven like the rush of a mighty wind, and it filled all the house where they were sitting. And there appeared to them tongues as of fire, distributed and resting on each one of them. And they were all filled with the Holy Spirit and began to speak in other tongues, as the Spirit gave them utterance. (Acts 2: 1-4)

The Paschal season comes to a close Sunday with Pentecost, the day the Holy Spirit descended upon the Apostles. There are many simple ideas out there for celebrating the gift of the Holy Spirit with children, and for several years I’ve been wanting to make these cute treats. They have the added bonus of being seasonal too!

Flames of Pentecost Cupcakes with sliced strawberries “flames” to represent the tongues of fire!

Pentecost is not as easy to explain to children as Christmas or Easter, but is certainly a day worth celebrating!

But the fruit of the Spirit is love, joy, peace, patience, kindness, goodness, faithfulness, gentleness, self-control…If we live by the Spirit, let us also walk by the Spirit. (Galatians 5:22-23, 25)


Brown Rice Treats

I had intended to move on to some summer meal ideas this week, but I keep thinking of snack ideas I cannot resist sharing! Here is one that is a more natural alternative to Rice Krispie Treats.

Brown Rice Snacks

Ingredients

1/2 cup natural peanut butter

1/2 cup honey

1 teaspoon vanilla

1 teaspoon cinammon

2 cups brown rice cereal

Directions

1. Add the peanut butter, honey, vanilla, and cinnamon to a large bowl and mix well. The amounts listed above are flexible. I reduced the honey and increased the peanut butter. I thought they were too cinnamon-y, so next time I”ll reduce that as well.

2. Add the cereal and slowly mix until all the cereal is well-coated.

3. Roll into walnut-sized balls and place on a greased or wax paper lined pan.

After I had rolled about half the mixture, I added a little Ricemellow Creme to what as left. It added a little more stickiness and sweetness. I definitely wouldn’t add it without reducing the honey, as I did in the first step.

Really play around with these- roll the balls in crushed nuts or coconut. You could also add flax, nuts, or coconut right to the cereal mixture. Enjoy!


Friday, June 3, 2011

Heavenly "Jell-O" Treats

“So then the Lord Jesus…was taken up into heaven, and sat down at the right hand of God.” (Mark 16:19)

The Ascension of the Lord is celebrated 40 days after Easter, and this year that was yesterday (although some move the feast to the seventh Sunday after Easter, two days from now)! Either way, it’s not too late to include these tasty treats as you celebrate the completion of Christ’s redemptive work.

While this is not the healthiest snack for kids I’ve shared over the past few posts, this is an improvement over Jell-O (which contains artificial flavors, sugar or artificial sweetener, and dyes), and can be adapted by substituting your favorite juice. Leave out the whipped cream, and this is a perfect snack for a hot afternoon!

Note that this recipe does still use gelatin, but agar-agar is a good vegan substitute.

Heavenly Jell-O

Ingredients

4 envelopes unflavored gelatin

1 cup cold blueberry juice

3 cups blueberry juice, heated to boiling

Heavy cream, for whipping

Directions

1. Sprinkle gelatin over cold juice in a large bowl; let stand one minute.

2. Add hot juice and stir until gelatin completely dissolves.

3. Pour into 9 x 13 pan or individual serving cups.

4. Refrigerate until firm, about three hours.

5. Enjoy with whipped cream!

The effect of a blue sky and white clouds isn’t evoked as well with the blueberry juice as blue dye, but the taste is heavenly!

For more traditional food celebrating the liturgical year, I recommend A Book of Feasts and Seasons and All Year Round.


Friday, May 27, 2011

Green Smoothies

I’ve already shared a few ideas for enjoying yogurt, and here’s a popular idea that adds to the nutritional value of yogurt even more: green smoothies.

Start with plain yogurt and add any combination of fruit (fresh in season or frozen), juice, sweetener (just a taste!), supplements (flax-seed oil is typically my choice), wheat germ, etc. Top off with a handful of greens (fresh or frozen spinach, kale, etc.).

This week I found some blueberries in my freezer from last summer’s picking, mango, and frozen spinach. I had honey on hand just in case, but the fruit made the smoothie sweet enough.

Eyeball your amounts and adjust to taste as you go along. I used approximately 1 1/2 cups of yogurt, a cup of spinach, a cup of blueberries, and a handful of mango.

Blend until you’re happy with the consistency, adjusting ingredients as needed.

Note: for those who may object to greens in their smoothies, a dark fruit like blueberry or raspberry is good at masking the color.

Enjoy!

This little guy kept proclaiming he didn’t like spinach while he gulped down two glasses!

Yogurt: A Powerhouse

In my opinion, yogurt is a “power food.” Loaded with probiotics, calcium, and protein it’s my favorite go-to for a quick pick-us-up.

Yogurt is also one of our favorite foods to “doctor” for snacks and meals. There are so many options! Yogurt is delicious on its own, in smoothies, with fruit, as a dressing, marinade, dips or garnish!

Since we’re talking about snacks this month, let’s focus on that for today.

First, you need to choose your yogurt. I make my own every week or so, but if you’re buying yours, go for the simplest choice out there: plain (full fat is best, and choose low-fat options carefully).

Avoid yogurts geared especially for kids (packed with sugar, artificial flavors and colors) as well as most fruit-flavored choices and “light” yogurts. Remember that while these sound appealing in terms of calories, the real food is replaced with artificial sweeteners such as aspartame, dyes, preservatives, and the fat is sometimes replaced with fillers to help the taste.

Be aware that even organic yogurt products still have thickeners, sugar, and some form of coloring, even if it is more “natural.”

Read your labels! The ingredient list should say “milk” and “active cultures.” Nothing else!

It is far better to have a serving of plain, yogurt you sweeten or otherwise enhance yourself !

I can hear your protests now, however, about the convenience of single serve yogurt and the moans about pickiness from kids. I know! The ideas I have below are very simple, however, and something should appeal to everyone!

  • If you must, you can find plain yogurt in single serve containers. You can start there and add your own fruit or a dollop of honey.
  • Make your own single serve containers! I always keep my eyes open for small 1/2-1 cup containers. There are options out there in plastic or glass.
  • If you aren’t a fan of whole fruit in your yogurt, puree yogurt and fruit (fresh in season or frozen if not) and pour into containers. (Add a tablespoon of honey or maple syrup if you need to). This only takes a few minutes every time you do it and you are ready for snacks or lunches.
  • You can also freeze portions of your fruit/yogurt combo. I freeze in ice cube trays for babies and young toddlers and in freezer pop molds or Dixie cups for older kids. Sure to delight on a hot day!
  • Mix a little fruit juice with yogurt and serve immediately or freeze for another popular treat.
  • Yogurt and granola is, of course, a classic combination. I haven’t found my perfect granola recipe yet, so please share if you have one!
  • If you’re interested in branching out, goat’s milk yogurt is one of my favorite indulgence. It’s delicious on its own, but can also be served with fruit, nuts, or cereal.

There are dozens of ways to dress up plain yogurt. Get creative then come back to share your ideas!


Friday, May 20, 2011

Homemade Wheat Thins

I have a confession: I love Wheat Thins. The ingredient list contains some questionable items, however, and includes the always delectable BHTin the packaging material.” For an everyday snack cracker that’s healthy, this recipe is quick and simple and does taste like “the real thing.”

Wheat Thins (from Recipeland.com)

Ingredients

1 1/2 cups flour (I used whole wheat pastry)

1/2 cup whole wheat flour

1/2 cup sugar

1/4 teaspoon salt

2 Tablespoons butter

2/3 cup milk

salt or other dried herbs for sprinkling

Directions

1. Preheat the oven to 325.

2. In a large bowl, combine the flours, sugar, and salt. Cut the butter into the flour until the mixture resembles coarse meal.

3. Blend in the milk slowly, using only enough to form a dough that will hold together in a ball. Divide the dough into 2 equal portions for rolling.

4. On a floured surface or pastry cloth, roll the crackers thin, 1/16 to 1/8 inch.

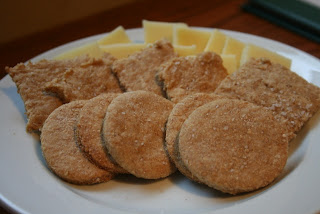
5. Lightly sprinkle the tops with salt and gently roll over the dough with your rolling pin. (Be careful, it’s very easy to over-salt these!) With a sharp knife, cut the crackers into 2-inch squares. I also made half this batch into circles.

6. Transfer them to an ungreased baking sheet. Prick each cracker in 2 or 3 places with the tines of a fork.

7. Bake for 20 to 25 minutes, or until the crackers are lightly browned. Cool on a rack.

Ready for cheese-and-cracker snack time!

These crackers will obviously not last as long as their packaged counterparts, so try to eat them up in a few days. Once you taste them, however, I don’t think that will be a problem!


Chocolate Graham Crackers

Today I’m passing along two cracker recipes. These are a bit more time intensive than the granola bars I shared last week, but they are both worthwhile additions to your “snack rotation.”

My mom gave me this recipe that she clipped from a magazine years ago. I’ve made a change from the original, but I’m including both options below.

This is a delicious recipe! I’m not sure any chocolate cracker recipe can be called truly “healthy,” but these are more wholesome alternative to conventional chocolate graham crackers or Teddy Grahams. They hit the spot when you want a little sweet, and with some peanut butter (no sugar added, please!) they make a to-die-for snack.

Chocolate Graham Crackers

Ingredients

1/3 cup milk

1/4 cup honey or maple syrup

2 oz. chocolate chopped (bittersweet or semi-sweet)

1 tablespoon vanilla

2 cups all-purpose flour (I used whole wheat pastry flour)

1 cup brown sugar

1/2 cup whole wheat flour

1 teaspoon baking soda

1/2 cup butter

Directions

1. In a small saucepan combine the milk, honey and chocolate. Cook and stir over low heat until chocolate is melted. Cool 15 minutes. Add vanilla.

2. In a food processor bowl combine the all-purpose or pastry flour, brown sugar, whole wheat flour, baking soda, and salt. Pulse to combine. Add butter; pulse until mixture resembles coarse crumbs.

You can also mix dry ingredients in a bowl then cut in butter using a pastry blender.

3. Add chocolate mixture and pulse (or stir as I did since my food processor is very small) until just combined.

4. If necessary, knead dough gently to form a ball.

5. Divide dough into fourths. Wrap each portion in plastic wrap and chill for about an hour.

6. Preheat oven to 350. On a lightly floured surface, roll one portion of the dough at a time to 1/8″ thickness. The dough can be a little “touchy”, but as you work with it, it loosens up and becomes easy to roll and form. Cut into 3-inch circles, squares, or into another shape.

7. Bake 8-10 minutes or until edges are firm. Remove and cool completely on wire rack. Makes approximately 4 1/2 dozen crackers.

I think these are even tastier after they have “aged” for a day. Enjoy!


Friday, May 13, 2011

Chewy Granola Bars

Granola bars or cereal bars are often a staple in a snack rotation. However, they are also typically filled with ingredients and fillers such as high fructose corn syrup, red dye #40, and butylated hydroxytoluene (also known as BHT).

Here is a homemade alternative. You can make these on the sweet side or the strictly healthful side. Skip conventional vegetable oil, peanut butter, and chocolate chips. A few swaps and these are much healthier and twice as tasty!

I promise that these can be put together in about five minutes. Grab and go for an easy snack!

Here’s our “dessert” version with raisins and organic dark chocolate and peanut butter chips.

Chewy Granola Bars

Ingredients

1/2 cup natural peanut butter (no sugar!) or Sunbutter
1/3 cup honey (local honey is best, maple syrup also works)
1/4 cup coconut oil (this time I used a more neutral sunflower oil)
1 cup oats
1 cup total of any combination of sesame seeds, coconut flakes, sunflower seeds, dried fruit (go sugar free!), chocolate chips (the darker the better)

Directions

1. In a medium sized saucepan, melt together peanut butter, honey and oil.

2. Remove from heat and add one cup of oats. Choose your favorite combination of coconut flakes, sesame seeds, sunflower seeds, dried fruit and mini chocolate chips, to equal a total of one cup. (I just got out my one cup measuring cup and poured in the ingredients until the cup was full.) Pour in and stir well. (I recommend letting the mixture cool a bit first if you’re adding chocolate chips. Otherwise they’ll completely melt. Of course, that’s yummy too!)

3. Stir well, then spread mixture into a 8×8 or 9×4 pan.

4. Chill for two hours, then cut into bars.

Another favorite is Awesome Oatmeal Bars. This is another flexible recipe. Get creative and make it your own! You’ll never reach for store-bought again!